You can have the most beautiful cabinets in the world, but if they’re laid out wrong, your kitchen will frustrate you daily.
I’ve seen kitchens with $40,000 worth of gorgeous custom cabinetry that are absolutely miserable to cook in. The pots are stored across the kitchen from the stove. The coffee mugs are three steps away from the coffee maker. The trash can requires a trek every time you’re prepping vegetables.
Then I’ve seen $8,000 kitchens with basic cabinets that work beautifully because someone actually thought about workflow, storage zones, and how humans actually use kitchens.
The difference isn’t money. It’s understanding functional layout principles and applying them to your specific space and cooking habits.
This guide covers how to plan cabinet layouts that actually work—where to put what, how to organize storage zones around the work triangle, ergonomic heights and depths, and the practical decisions that separate kitchens you love from ones you tolerate.
Let’s design a kitchen that functions as well as it looks.
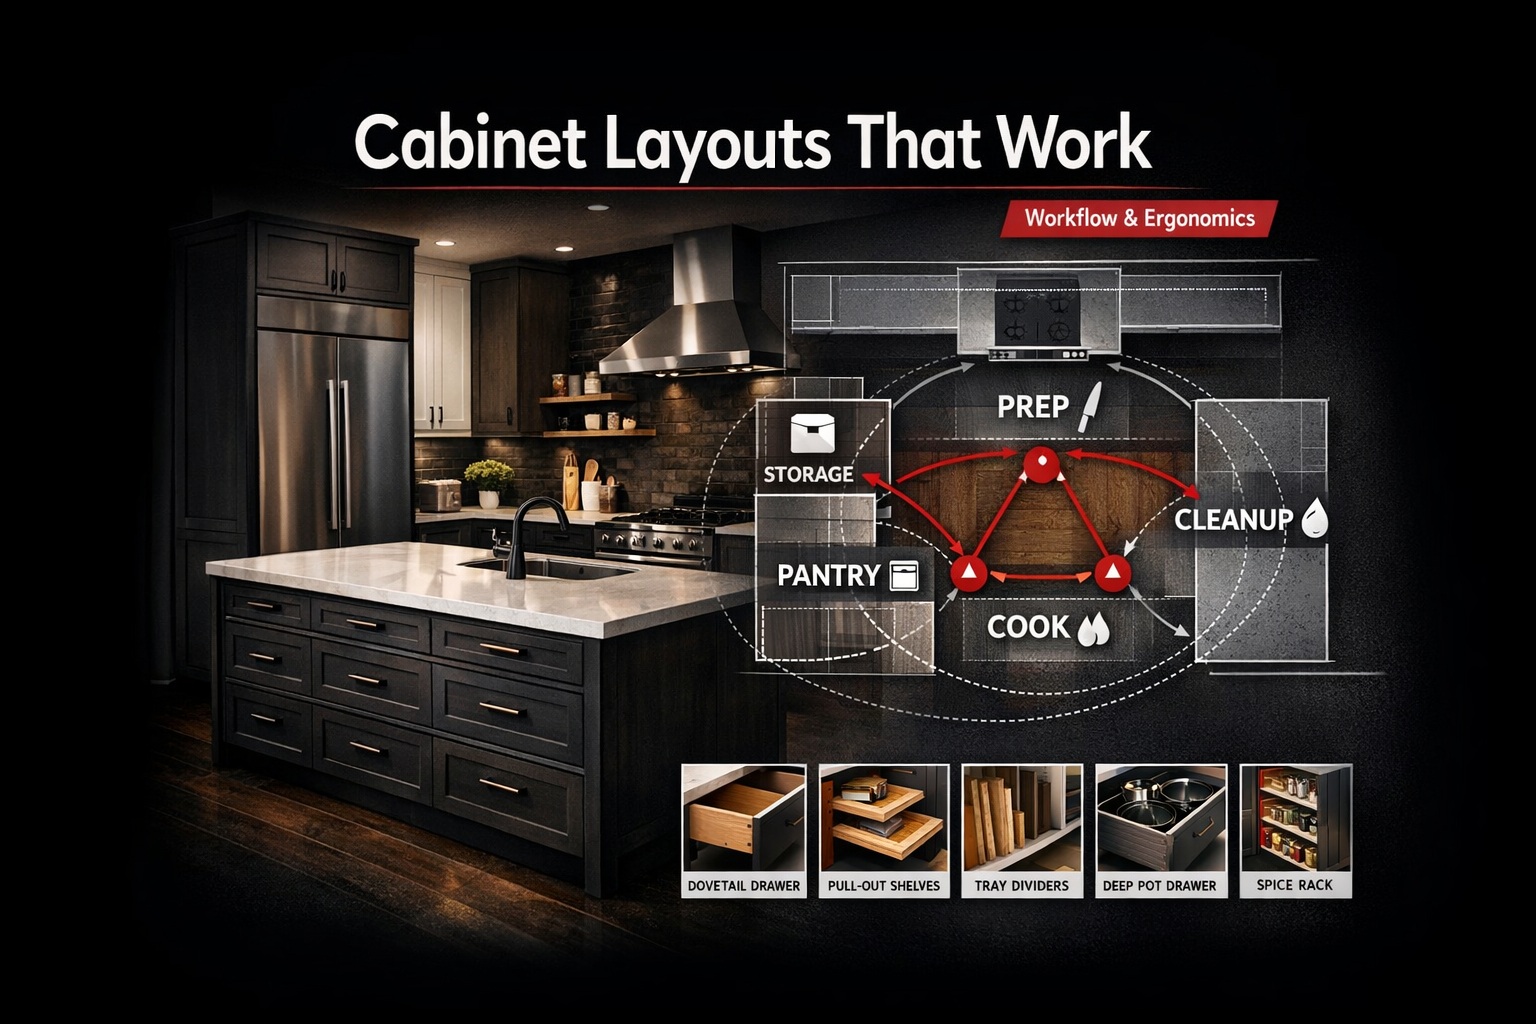
Understanding the Kitchen Work Triangle
This concept is old but it still matters because it reflects how people actually cook.
The Classic Triangle
Three points: refrigerator, sink, and stove. Your primary workflow moves between these constantly.
- Refrigerator → get ingredients
- Sink → wash and prep
- Stove → cook
- Back to sink → cleanup
The triangle concept says these should be reasonably close to each other with clear paths between them. Not so close you’re cramped, not so far you’re walking marathons.
Ideal distances:
- Each leg of triangle: 4-9 feet
- Total perimeter: 13-26 feet
Too small and you feel cramped. Too large and you’re wasting steps.
Modern Variations
Not all kitchens fit the classic triangle, and that’s okay. Modern kitchens might have:
- Multiple work zones (two people cooking simultaneously)
- Islands that become fourth or fifth work points
- Open layouts where the “kitchen” extends into living spaces
- Specialized stations (baking zone, coffee bar, etc.)
The principle still applies: put frequently-used items near where you use them, minimize unnecessary movement.
Storage Zones: What Goes Where
Think of your kitchen in zones based on activity. Store items in the zone where you use them.
The Cooking Zone
Location: Cabinets near the stove/cooktop.
What goes here:
- Pots and pans (in lower cabinets or drawers)
- Cooking utensils (spatulas, wooden spoons, tongs)
- Oils and frequently-used seasonings
- Pot holders and trivets
- Lids (organize these so they’re accessible, not tumbling out)
Storage solutions:
- Deep drawers for pots (way better than cabinets where they stack)
- Pull-out organizers for lids
- Drawer dividers for utensils
- Narrow pull-out for oils and spices within arm’s reach of stove
What NOT to store here: Rarely-used serving dishes, bakeware, food storage containers. These don’t belong in prime cooking real estate.
The Prep/Cleanup Zone
Location: Cabinets near the sink.
What goes here:
- Everyday dishes and glasses (easy to put away after washing)
- Cutting boards
- Knives
- Prep bowls
- Dish soap, sponges, towels
- Trash and recycling (ideally pull-out bins under sink)
- Dishwasher supplies if dishwasher is here
Storage solutions:
- Upper cabinets for dishes and glasses (easy reach from dishwasher)
- Knife block or magnetic strip nearby
- Pull-out trash/recycling bin
- Tray dividers for cutting boards
- Drawer for dish towels near sink
Why this matters: You wash dishes, put them away directly above. You prep vegetables, toss scraps directly into trash below. Minimal movement.
The Food Storage Zone
Location: Cabinets near refrigerator.
What goes here:
- Dry goods (pasta, rice, canned goods)
- Snacks
- Breakfast items
- Food storage containers and plastic wrap
- Lunch-packing supplies
Storage solutions:
- Pantry cabinet with pull-out shelves
- Deep drawers for cereal boxes and snack bags
- Container storage with lids organized
- Lazy Susan for canned goods in corner cabinet
Design tip: If you have a walk-in pantry, that becomes your main food storage. Use kitchen cabinets for overflow and frequently-accessed items.
The Beverage Station
Location: Often separate from main work zones.
What goes here:
- Coffee maker, kettle, or espresso machine
- Coffee, tea, hot chocolate
- Mugs
- Sugar, honey, other beverage additions
- Water glasses
Storage solutions:
- Upper cabinet for mugs directly above coffee maker
- Drawer or lower cabinet for coffee supplies
- Pull-out for small appliances if not kept on counter
Why separate: Beverage prep doesn’t interfere with cooking. Someone making coffee doesn’t block someone cooking breakfast.
The Baking Zone
Location: Often near prep zone, needs countertop workspace.
What goes here:
- Mixing bowls
- Baking pans and sheets
- Measuring cups and spoons
- Baking ingredients (flour, sugar, baking powder)
- Hand mixer, stand mixer
- Rolling pins, pastry tools
Storage solutions:
- Deep drawers for baking pans (vertical dividers keep them organized)
- Pull-out for stand mixer (or keep on counter if used frequently)
- Containers for flour and sugar
- Drawer dividers for measuring tools
Reality check: If you rarely bake, you don’t need a dedicated baking zone. Store these items in less accessible cabinets.
Ergonomic Cabinet Heights and Depths
Where you put cabinets affects how comfortably you can use your kitchen daily.
Upper Cabinet Heights
Standard: Bottom of upper cabinets 18 inches above countertop (54 inches from floor). Top of uppers 84-90 inches from floor.
Considerations:
- Taller ceilings: Extend uppers to ceiling for maximum storage, but highest shelves become decorative (too high to reach comfortably)
- Shorter users: Lower uppers slightly (16 inches above counter) for easier access
- Taller users: Can go higher without issue
What’s comfortable: Items you use daily should be on shelves between counter height and eye level (about 54-66 inches from floor). Higher shelves for occasional-use items.
Lower Cabinet Heights
Standard: 34.5 inches floor to top of cabinet (36 inches with countertop).
Generally not adjustable because countertop height is standardized. Exceptions:
- Baking stations can be lower (32-33 inches) for better kneading height
- Island seating requires 28-30 inch height on seating side
- Accessibility needs might require adjustable-height sections
When planning cabinet heights alongside countertop selection, consider the combined height and how it affects workflow comfort.
Cabinet Depths
Upper cabinets: 12 inches deep standard. Enough for plates and glasses, not so deep you can’t reach the back.
Lower cabinets: 24 inches deep standard. This depth works with standard 25-inch deep countertops.
Exceptions:
- Refrigerator depth cabinets: 24-27 inches to match fridge depth
- Pantry cabinets: Can be 12-18 inches (shallower = better visibility)
- Islands: Often 27-30 inches deep to accommodate seating overhang
Accessibility rule: If you can’t comfortably reach the back of a cabinet, it’s too deep or needs pull-out shelves.
Layout Configurations for Different Kitchen Shapes
Your kitchen’s physical shape determines cabinet layout options.
Galley Kitchen
Two parallel runs of cabinets with walkway between.
Ideal aisle width: 42-48 inches. Enough for one person to work comfortably, two to pass each other.
Cabinet placement strategy:
- Sink and prep on one side
- Stove and main cooking on other side
- Refrigerator at one end
Storage advantage: Tons of cabinet and counter space in small footprint.
Workflow: Linear. Works well for one cook, gets crowded with two.
L-Shaped Kitchen
Cabinets on two perpendicular walls.
Cabinet placement strategy:
- Sink on one leg
- Stove on other leg
- Refrigerator on either leg or at end
Corner challenge: The corner where walls meet creates awkward cabinet space. Solutions:
- Lazy Susan cabinet
- Diagonal corner cabinet
- Pull-out corner drawers (expensive but awesome)
Workflow: Natural triangle with short distances between work zones.
U-Shaped Kitchen
Cabinets on three walls.
Cabinet placement strategy:
- Distribute sink, stove, fridge across three walls
- Lots of storage and counter space
- Can feel closed-in if too small
Minimum dimensions: 8 feet between parallel runs. Otherwise you’re bumping into opposite cabinets.
Storage advantage: Maximum cabinets. Great for serious cooks.
Island Kitchen
L-shaped or U-shaped with island added.
Island function options:
- Extra prep space with storage below
- Second sink
- Cooktop (requires ventilation planning)
- Seating (requires overhang and knee space)
- Combination (storage + seating)
Cabinet configuration: Island base cabinets can open to kitchen side, seating side, or both. Consider what makes sense for your workflow.
Clearance: Minimum 42 inches between island and perimeter cabinets. 48 inches is better. 54 inches if two cooks regularly work simultaneously.
Specialized Cabinet Configurations
Beyond basic layouts, specific cabinet types solve specific problems.
Corner Solutions
Corners are where storage goes to die unless you plan carefully.
Lazy Susan cabinet: Rotating shelves bring items to you. Works but wastes some space (circular shelves in square cabinet).
Magic Corner/Le Mans: Pull-out systems that bring corner contents forward. More usable space than Lazy Susan.
Diagonal corner cabinet: Angled front makes corner accessible. Less storage than other options but simpler.
Two separate cabinets: Just treat corner as two independent cabinets. Some dead space but simple and cheaper.
Understanding the differences between custom and modular approaches helps you decide which corner solutions are feasible for your budget and space.
Tall Pantry Cabinets
Full-height pantries (84-96 inches tall):
- Best with pull-out shelves (way more functional than fixed shelves)
- Position near refrigerator for logical food storage grouping
- Width: 18-24 inches typical
- Can substitute for upper cabinets if you prefer
Appliance Garages
Upper corner cabinets with tambour door or lift-up door that hide small appliances.
When they work: If you use appliances frequently but want uncluttered counters.
When they don’t: If you rarely use the appliances (they just sit there taking up space) or if access is awkward.
Drawer Stacks
Deep drawer stacks replacing traditional base cabinets.
Advantages:
- See everything (no digging in back of cabinet)
- Easier access (pull out rather than crouch down)
- Better organization
Disadvantages:
- More expensive than cabinets
- Weight limits (can’t overload like you can a cabinet)
Where to use: Pot/pan storage, utensil storage, food storage. Skip for large/light items where cabinet volume is needed.
The quality of drawer construction—especially dovetail joinery and full-extension hardware—determines whether drawer stacks hold up to daily use or fail within a few years.
Traffic Flow and Clearances
Cabinets affect how you move through the kitchen.
Aisle Widths
Minimum comfortable: 42 inches in work aisles.
Preferred: 48 inches for one cook, 54 inches for two cooks.
Maximum useful: 60 inches. Beyond that, you’re walking unnecessarily far between work zones.
Landing Space
Countertop next to appliances where you set things down.
Refrigerator: 15 inches of counter on handle side (so you can set groceries down while unloading).
Cooktop/range: 12 inches on one side, 15 on other (for setting down pots).
Sink: 24 inches on one side, 18 on other (for dish stacking and drying).
Plan cabinet layout to preserve these landing spaces. This is especially important if you’re also updating flooring throughout the space, as transitions between materials affect traffic patterns.
Door Swing Clearances
Cabinet doors need space to open fully.
Perpendicular cabinets: Don’t place cabinets where doors would hit each other.
Traffic paths: Doors shouldn’t block main traffic flow when open.
Appliances: Refrigerator and dishwasher doors need clear swing. Don’t box them in with cabinets.
Material Selection and Layout
The materials you choose affect cabinet layout possibilities.
Why Materials Matter for Layout
Different cabinet materials have different structural properties that affect layout options:
Plywood: Stronger, supports wider spans between supports. Allows larger cabinet boxes.
Particleboard: Needs more internal support. Limits maximum cabinet widths.
Solid wood: Can warp with width. Very wide cabinets should use engineered materials.
MDF doors: Great for painted finishes but heavier. Requires quality hinges for tall doors.
Matching Materials to Function
High-traffic zones benefit from more durable materials:
- Cooking zone cabinets: Need heat-resistant finishes, easy-clean surfaces
- Sink area cabinets: Must resist moisture
- Pantry cabinets: Need sturdy shelving to support weight
Understanding complete cabinet design from materials through installation ensures your layout choices are supported by appropriate construction methods.
Workflow Optimization
Beyond physical layout, think about how you actually cook.
Primary vs Secondary Storage
Primary storage: Items you use daily. These get premium real estate (eye level, easy reach, near where used).
Secondary storage: Items used occasionally. These get less accessible spots (high shelves, deep cabinets, far corners).
Rare-use storage: Holiday dishes, specialty equipment. These go in least accessible spots or even outside the kitchen.
Don’t waste prime cabinet space on things you use twice a year.
Prep-to-Cook-to-Clean Flow
Think through the cooking process:
- Get ingredients (refrigerator, pantry)
- Prep (counter near sink, cutting boards, knives)
- Cook (stove, oven)
- Serve (plates should be near cooking zone or dining area)
- Clean (sink, dishwasher, trash)
Cabinet layout should support this flow with minimal backtracking.
Multi-Cook Considerations
If two people regularly cook together:
- Create separate work zones so you’re not constantly in each other’s way
- Duplicate key items (two sets of prep tools, two trash locations)
- Plan counter space so both can work simultaneously
- Consider second sink if space and budget allow
Adapting Layouts to Your Cooking Style
Generic layouts don’t account for how YOU use your kitchen.
The Serious Cook
Priorities:
- Lots of lower cabinet/drawer space for pots, pans, and tools
- Premium storage near stove (most-used zone)
- Substantial prep counter space
- Pantry for ingredient storage
Skip: Extensive dish storage (you probably have select items you use), decorative upper cabinets (focus on function).
The Minimal Cook
Priorities:
- Microwave and refrigerator easily accessible
- Storage for takeout containers and minimal cookware
- Space for small appliances (coffee maker, toaster)
Skip: Extensive pot/pan storage, large pantry, baking supplies.
The Baker
Priorities:
- Lower cabinet height for comfortable kneading
- Storage for stand mixer and baking equipment
- Ingredient storage (flour, sugar, etc.)
- Counter space for rolling dough
Design consideration: Dedicated baking zone separate from main cooking area.
The Entertainer
Priorities:
- Serving dish storage
- Bar/beverage area
- Display storage for nice items
- Easy cleanup (large sink, dishwasher, trash)
Layout consideration: Kitchen opens to dining/living area, island with seating for guests to hang out while you cook.
Beyond the Kitchen: Integrated Design
Cabinet layout doesn’t exist in isolation from the rest of your home.
Thinking Holistically
If you’re doing a major home renovation project, kitchen cabinet layout should integrate with:
- Adjacent room layouts and traffic patterns
- Overall home aesthetic and style
- Structural changes or additions
- Plumbing and electrical locations
Poor cabinet layout can undermine even the most beautiful overall design.
When Space Is Limited
Sometimes optimal cabinet layout requires more space than you have. Options:
Expand the footprint: If you’re considering room additions or converting existing space, factor kitchen expansion into the planning.
Vertical storage: Use full-height cabinets and maximize ceiling height.
Adjacent storage: Pantry or storage room adjacent to kitchen extends your functional space without expanding the actual kitchen.
Bathroom Cabinet Parallels
Interestingly, many of the same workflow principles apply to bathroom cabinet planning. Store items where you use them, design around traffic flow, respect ergonomic heights—these concepts translate across spaces.
Making Decisions for Your Space
How do you actually apply this to your kitchen project?
Start with Your Non-Negotiables
What are the requirements you can’t compromise on?
- Must accommodate X number of cooks simultaneously?
- Need wheelchair accessibility?
- Have to keep existing window/door locations?
- Budget limits cabinet quantity?
These constraints narrow options and make decisions easier.
Measure Your Habits
Before finalizing layout:
- Track what you actually cook for two weeks
- Note which items you use daily vs rarely
- Identify pain points in current kitchen
- Think about whether you’ll cook differently with new kitchen
Design for reality, not aspirations. If you don’t bake now, you probably won’t start just because you have a baking zone.
Work with Professionals
For expert kitchen cabinet design in your area, professional designers help you avoid expensive mistakes. They’ve seen what works and what doesn’t in real-world use.
Experienced kitchen specialists can evaluate your space, understand your workflow needs, and create layouts that genuinely improve how you use your kitchen—not just how it looks.
The Bottom Line
Cabinet layout determines whether your kitchen is a joy or a chore to use daily.
Beautiful cabinets in a dysfunctional layout is money wasted. Basic cabinets in a thoughtful layout creates a kitchen you actually enjoy using.
Think about workflow—the path from refrigerator to prep to cooking to cleanup. Store items where you use them. Respect ergonomic heights and clearances. Design for how you actually cook, not how magazines say kitchens should look.
The best kitchen cabinet layout is the one that disappears—where you don’t think about the kitchen itself because everything just works intuitively. You’re focused on cooking, not hunting for the colander or walking across the kitchen for the third time to get something you forgot.
That’s what good layout delivers. And it’s worth way more than fancy cabinet finishes or trendy hardware.
Leave a Reply